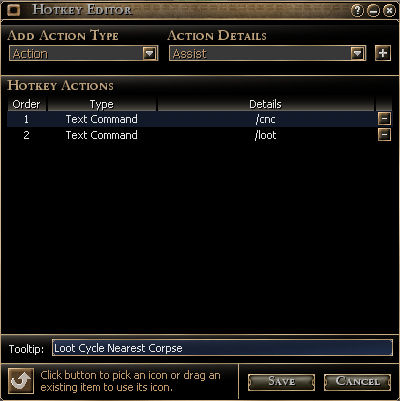
Loot Corpse HotkeyThere is no action types, in the pulldown menus, of hotkeys to Select a dead mob or to loot corpse, but you still can do it. There is a valid slash command /snc (Select Nearest Corpse). If you were to type this command in the chat bar, it would target the nearest dead corpse next to you. Another valid slash command /loot will open loot window, on the targeted corpse (only opens window, no way to take items automatically). You will still have to manually click the 'Take All' button option, in the window. Using these 2 text commands, you can loot a corpse with a click and get back to what you were doing. Setup hotkey to loot nearest corpse:
Setup hotkey to loot multiple corpses: This is idea if you have many corpses close to each other.
|
||
Add Color to ChatHave you ever seen someone speak in the main chat window (Say) and it shows in color and wondered how to do it? Well, heres how! Note this does not work in chat channels. It only works when you speak in Main chat tab using the Say (or /say) method. Just typing in Main chat tab, automatically does the Say method. 1) Click the Chat Settings button on far right (on bottom of chat screen): 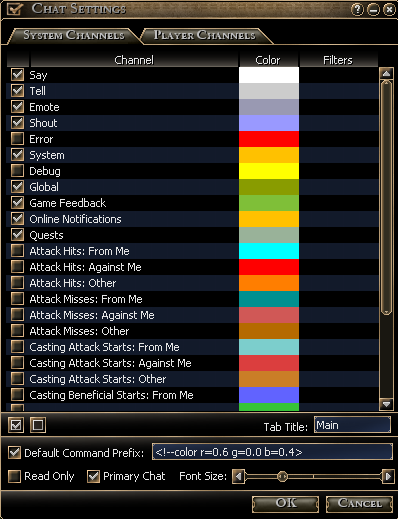
The "Default Command Prefix" box needs to be checked. As well as the "Primary Chat" box. Note the <!--color r=0.6 g=0 b=0.4> tag, beside Default Command Prefix checkbox? This will append the text, in the box, at the beginning of any chat (say) in main channel. This is the color for orange. But you can experiment and change the values of r g b (Red, Green, blue) in the range of 0 to 1.0 Copy the code inside the box and paste into box on game: Pick your custom colors with a modified HTML Color Picker, visit: http://istariareference.com/color You'll want to pick the rgb-Istaria Values on this chart! To learn how to add colored chat in more than one window; example Main chat and Group chat, view Color Chat page. |
||
Toggle Cargo DiskYou can Equip and Unequip your cargo disk with one hotkey.
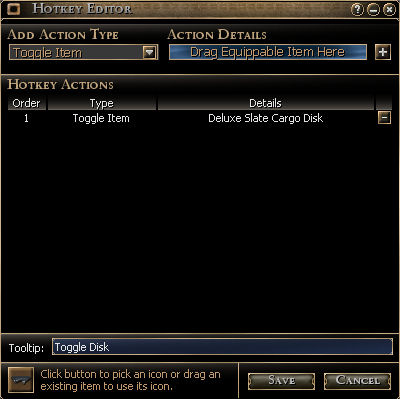 Heres another hotkey you can create to View Cargo Disk Inventory: 1) Drag your cargo disk (from your inventory window) to any hotkey. Thats it, done. Now when you press this hotkey, it will open your cargo disk inventory window. |
||
| More Hotkey Info/Examples on Wiki: Hotkeys | ||
Make Chat Tabs FlashBelow, you will see the "New Player" chat tab flashing, even though I am currently in Main chat tab. This lets me know someone has spoken in that channel. 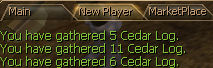
Simply right click any where on the chat window and choose "Properties". Slide the Window Transparency slider over, so your chat background is no longer completely black. After a certain point (around 1/4?) it will start flashing. I have mine set at 45%, but it will start flashing below this. When its completely to the left (Default), it will not flash.  Summary: By changing this setting, you will always know when someone has spoken in ANOTHER chat channel, that you are joined in. |
||
Disable Loading ScreenTo disable loading screen type this in chat bar: "/setpref useLoadingScreen false" without the quotations. To enable it again, type "/setpref useLoadingScreen true" without the quotations. NOTE: Should your game crash with the vault open AND the loading screen disabled, you might find the vault loading screen hang when you start the game up and never load your vault contents. Even if you close your vault and exit the game, then restart it, the vault window STILL will usually automatically open and keep hanging. If this happens, you will have to ENABLE the loading screen and restart the game to make the vault contents load! Once the loading screen goes away, the vault should appear with the contents in there. Now you can close the vault and disable loading screen again. Also, this setting is stored in the Game Folder\Prefs\Clientprefs_common.def file. You can edit this with a text editor, such as notepad, as well. |
||
Disable Environment EffectsIf you disable the effects, the sky will be black and it will appear to be daytime (ground is bright, not dimmed), all the time. Additionally, there will be no weather effects. Rain, blizzards, etc. Blighted areas will no longer look gloomy either. Effective client 386.134 (Apr 6, 2015) the commands has changed. Previously environmentSystem (true|false) would toggle this behavior. You now ALWAYS want environmentSystem = True. If you have been playing prior to Apr 6, 2015 then I strongly recommend you do this command first (you only need to do this one time). /setpref environmentSystem true Now you are ready to enable/disable the environment with this from now on (does not require a restart). Yes, you could also add this to a hotkey, one with true and another with false to toggle the environment (sky, fog, rain, blight, etc) To disable environment effects, type this in chat bar (not case sensitive): /setpref environmentSystemeffects false To enable it again, type: /setpref environmentSystemEffects true Also, this setting is stored in the Game Folder\Prefs\Clientprefs_graphic.def file. You can edit this with a text editor, such as notepad, as well. |
||
| Other slash commands on Wiki: Game_Settings page. | ||
Setscale CommandUsing setscale command will allow you to shrink any clickable object in the game. This includes yourself, buildings, resources, your friend, whatever. Anything clickable! You can also restore it back to normal size, too. This is done by setting an alias, that then can be accessed with a text command and/or hotkey. Note only you can see the changes, this doesn't alter the view of another player! In other words, if you shrink yourself to very tiny, other players will still see you as normal size. However, you must do a few steps before you can access the setscale command. Here is a posting from the forums, explaining the steps: How to setup setscale. However, I can simplify the process from the above link, with a couple of clicks: 1) Download setscale.zip (Last Updated February 15, 2015 to include any new commands). Extract the files to your game folder (the main/base folder, likely: C:\Program Files (x86)\Istaria). If you unsure, then right click on the icon you normally start the game with; Choose Properties... It will tell you what folder it is located in. This zip will extract a file called Commands_player.def. It will be extracted to (Your Game Folder)\Resources_Override\Resources folder. Likely this will be C:\Program Files (x86)\Istaria\Resources_Override\Resources folder. This file is simply a copy of Command_players.def, that already exists in your Resources folder, but it includes the setscale function and an alias of /ssc. Extracting this zip file, will create this folder, if it does not already exist. Again, make sure you extract the zip file to your main/base game folder. It will automatically extract to the correct folder above. 2) Everything should be working. Note you may need to restart the game once to recognize the new command. To do a quick test, click any object in the game (yourself, npc, resource, building, whatever). Type /ssc 0.25 in chat bar, Enter. Did the object shrink very small? If not, restart the game. If it still doesn't work, refer to Step 1 again. You likely didn't extract to the main game folder. Ok, if it worked, now type /ssc 1.1 in chat bar, Enter. Did the object return back to normal size? If so, then great, its all set up! Now you can use that in a hotkey. Edit Hotkey, Add Text Command and input /ssc 0.25 to shrink and/or another hotkey with /ssc 1.1 to return to normal size. You can adjust the values, you don't have to use 0.25. It can be in the range of 0.25 to 2.0. So yes, you can make the object slighty larger too, by using a value above 1.1. Just remember that 1.1 is normal size. 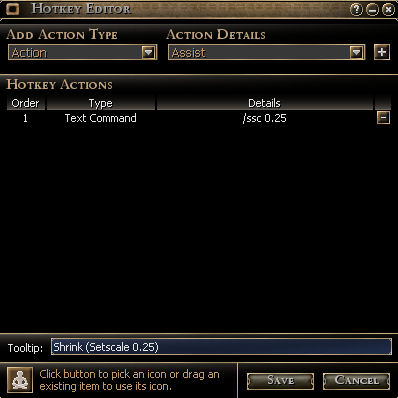
This hotkey will restore the target object to normal size: 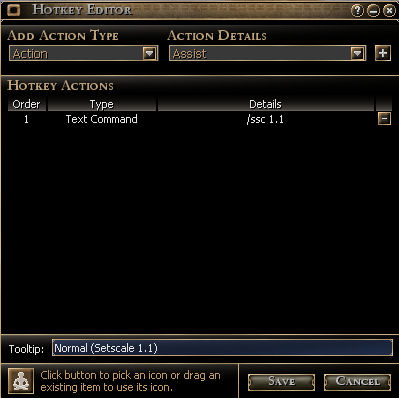
|
||